Structure Routing In Angular

- What is Routing?
The routing process allows you to dynamically update different pages and sections on a single page within your application. Another feature is that it provides manageability and ease of access by providing a distributed architecture in the project.
2. Why Do We Need Routing?
Defining routes in our application is useful because we can:
- separate different areas of the app;
- maintain the state in the app;
- protect areas of the app based on certain rules;
The application, we might see a search form where we can enter a search term and get a list of products that match that term. After that, we might click a given product to visit that product’s details page.Because our app is client-side, it’s not technically required that we change the URL when we change“pages”. But it’s worth thinking about for a minute: what would be the consequences of using the same URL for all pages?
- You wouldn’t be able to refresh the page and keep your location within the app
- You wouldn’t be able to bookmark a page and come back to it later
- You wouldn’t be able to share the URL of that page with others
Or put in a positive light, routing lets us define a URL string that specifies where within our app a user should be. In our inventory example we could determine a series of different routes for each activity, for instance:The initial root URL could be represented by http://our-app/. When we visit this page, we could be redirected to our “home” route at http://our-app/home. When accessing the ‘About Us’ area, the URL could become http://our-app/about. This way if we sent the URL http://our-app/about to another user they would see same page.
3. The Angular Router Module
The Router is a separate module in Angular. It is in its own library package, @angular/router. The Router Module provides the necessary service providers and directives for navigating through application views.
Using Angular Router you can
- Navigate to a specific view by typing a URL in the address bar
- Pass optional parameters to the View
- Bind the clickable elements to the View and load the view when the user performs application tasks
- Handles back and forward buttons of the browser
- Allows you to dynamically load the view
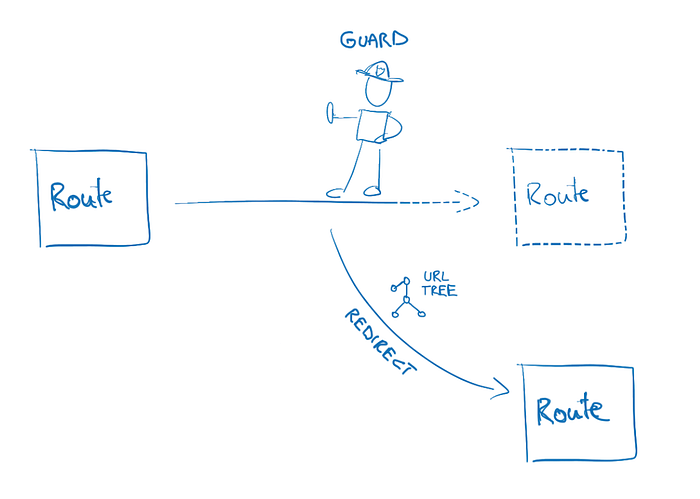
- Protect the routes from unauthorized users using Guards
4. How to use router in angular

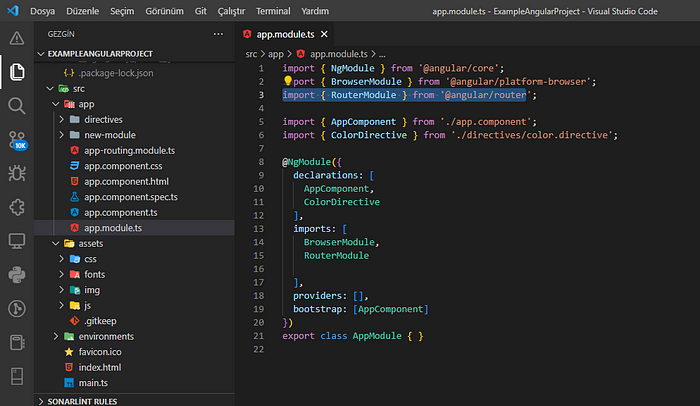
To use Routing in Angular, you must first add the Router Module in the app.module.ts file and specify that you will use it. For this, in the app.module.ts file
import { RouterModule } from '@angular/router';The file should be attached by typing the line. For usage, it should be specified that it will be used in the imports section in NgModule.
App.Routing.Module.ts
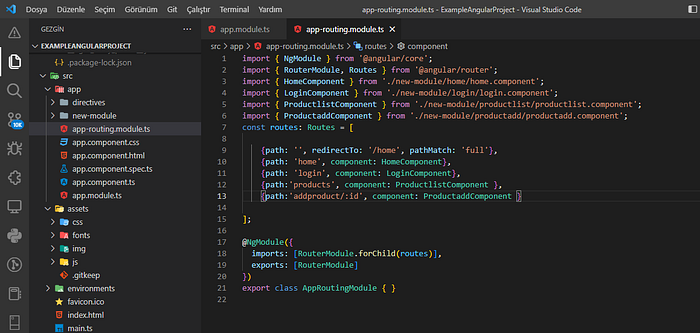
Path: When the route specified here is entered as a url, that defined object does the job. So for the object to work in the example, the url should be “localhost:4200”.
RedirectTo: You specify where to redirect. Here it will redirect to localhost:4200/home.
PathMatch: Defined as “prefix” by default. If we do not say full here, we will get an error. The reason is the path field is empty. So there is no path to prefix. Let me explain the difference like this;
When it is defined as Prefix, for example, if our path was example, even if the localhost:4200/example/abc url was entered, it would still be directed to home because it has an example prefix. But when pathMatch value is full, urlin expects to match exactly, so if we enter localhost:4200/example/abc, pathMatch would give us a nice big error in Angular console when full.
{ path: 'home', component: HomeComponent }When the url is entered as localhost:4200/home, it directs us to the Home Component. In other words, our Home Component is working between the <router-outlet> <router-outlet> tags.
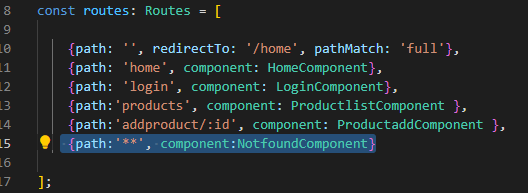
How can a rotuing be done to catch an undefined url?
For this process, known as page not found or 404 error, you need to add a “**” as a path in the variables you define as root and write the component you want to redirect.
5. Components of Angular Router Module
5.1 Router
The Angular Router is an object that enables navigation from one component to the next component as users perform application tasks like clicking on menus links, buttons or clicking on back/forward button on the browser. We can access the router object and use its methods like navigate() or navigateByUrl(), to navigate to a route.
5.2 Routes
Routes is an array of Route objects our application supports
5.3 RouterOutlet
The outerOutlet is a directive (<router-outlet>) that serves as a placeholder, where the Router should display the view.
5.4 RouterLink
The RouterLink is a directive that binds the HTML element to a Route. Clicking on the HTML element, which is bound to a RouterLink, will result in navigation to the Route. The RouterLink may contain parameters to be passed to the route’s component.
5.5 RouterLinkActive
RouterLinkActive is a directive for adding or removing classes from an HTML element that is bound to a RouterLink. Using this directive, we can toggle CSS classes for active RouterLinks based on the current RouterState.
5.6 ActivatedRoute
The ActivatedRoute is an object that represents the currently activated route associated with the loaded Component.
5.7 RouterState
The current state of the router including a tree of the currently activated routes together with convenience methods for traversing the route tree.
5.8 RouteLink Parameters array
The Parameters or arguments to the Route. It is an array which you can bind to RouterLink directive or pass it as an argument to the Router.navigate method.
6. How to configure Angular Router
6.1 Set the <base href>
The HTML <base> element specifies the base URL to use for all relative URLs contained within a document.
The Angular Router uses the HTML5 style of Routing (or PathLocationStrategy) as the default option. The router makes use of the browser’s history API for navigation and URL interaction.
<base href=”/”>
To make HTML5 routing to work, we need to set up the “base href” in the DOM. This is done in app’s index.html file immediately after the head tag.
6.2 Map Action to Routes
Next, we need to bind the click event of the link, image or button to a route. This is done using the routerlink directive
<li><a [routerLink]=”[‘product’]”>Product</a></li>
The routerLink directive accepts an array of route names along with parameters. This array is called as Link Parameters array.
When the application requests navigation to the route “product”, the router looks in the routes array and activates the instance of the component associated with the route “product”, which is ProductComponent. The browser address location & history is also updated to /product
Routerlink and href
Href is the core feature provided by Html for navigating through pages which reloads the page on click.
RouterLink is feature provided by angular to navigate to different components without reloading the page.
The major difference between the two is that href kills the state of the current page where routerLink doesn’t lose the state of the page.
example;
RouterLink retains its value after navigation if the page has an input text box. RouterLink can be considered as custom attribute of href in angular by overriding some properties like Page reload.
Conclusion
In this article, we learned to what is angular router is and learned how to use it.Thank you. See you in the next article…